Heema is an Oracle Ace Pro, IEEE Senior Member, and experienced speaker at both local and international IT conferences. With two decades of hands-on experience as a senior DBA and Solution Architect, Heema is adept at database administration and eager to embrace new technologies. Known for being customer-focused, organized, and self-motivated, Heema has a strong track record in managing technical projects and communicating solutions effectively. His global IT experience spans India, Japan, Malaysia, Singapore, Switzerland, and the USA. He holds a Bachelor of Engineering degree with Honors.
drwxrwxrwx. 8 applmgr oinstall 14 Jan 10 16:31 snapshot-Jan28
[hsatapat@app-test .snapshot]$
[hsatapat@app-test .snapshot]$ pwd
/u01/install/APPS/.snapshot
[hsatapat@app-test .snapshot]$
You can restore the snapshot
You can restore a file within the snapshot, or an entire snapshot using the cp command. Use the -r option when restoring a snapshot that contains subdirectories.
; <<>> DiG 9.9.4-RedHat-9.9.4-74.amzn2.1.2 <<>> +trace ctrwebtest.ctrworld.com ;; global options: +cmd . 518400 IN NS G.ROOT-SERVERS.NET. . 518400 IN NS H.ROOT-SERVERS.NET. . 518400 IN NS I.ROOT-SERVERS.NET. . 518400 IN NS J.ROOT-SERVERS.NET. . 518400 IN NS K.ROOT-SERVERS.NET. . 518400 IN NS L.ROOT-SERVERS.NET. . 518400 IN NS M.ROOT-SERVERS.NET. . 518400 IN NS A.ROOT-SERVERS.NET. . 518400 IN NS B.ROOT-SERVERS.NET. . 518400 IN NS C.ROOT-SERVERS.NET. . 518400 IN NS D.ROOT-SERVERS.NET. . 518400 IN NS E.ROOT-SERVERS.NET. . 518400 IN NS F.ROOT-SERVERS.NET. ;; Received 239 bytes from 192.168.0.2#53(192.168.0.2) in 26 ms
com. 172800 IN NS l.gtld-servers.net. com. 172800 IN NS m.gtld-servers.net. com. 172800 IN NS j.gtld-servers.net. com. 172800 IN NS e.gtld-servers.net. com. 172800 IN NS b.gtld-servers.net. com. 172800 IN NS d.gtld-servers.net. com. 172800 IN NS h.gtld-servers.net. com. 172800 IN NS f.gtld-servers.net. com. 172800 IN NS c.gtld-servers.net. com. 172800 IN NS g.gtld-servers.net. com. 172800 IN NS i.gtld-servers.net. com. 172800 IN NS k.gtld-servers.net. com. 172800 IN NS a.gtld-servers.net. com. 86400 IN DS 30909 8 2 E2D3C916F6DEEAC73294E8268FB5885044A833FC5459588F4A9184CF C41A5766 com. 86400 IN RRSIG DS 8 1 86400 20220913150000 20220831140000 20826 . R4bDq4hdjkcxxCS3hvtrd3mpkHogWQqXbi0KrvTbH0OPKdyaMOukt492 hGn710B9od8SgjfYpK2QiSCzVdv/v2PADbQzw/TgBIqldZyc3KqOdE1L vSVxX1/IqXMNqn5AiV0FOCclcmq29eSo6ayOQq2Ae/js7NEi8rYD7AvU vyOjxRqNbd8mj8bEgwbftVioQzDArLS6JBaX7xYa91z7oWbA4Ygt2R1F yCtS6A0y+OUAoXBZU22kgtQHcPEfXWJtM42KppoGtQ0dquxh4X0m++Kd nceJ7D2CWD1h1KyW7zYh5ZLzIS92spIE0s3Nv4a8eAgbKXKP0otwFxr0 SVDJQA== ;; Received 1186 bytes from 192.112.36.4#53(G.ROOT-SERVERS.NET) in 106 ms
ctrworld.com. 172800 IN NS ns-604.awsdns-11.net. ctrworld.com. 172800 IN NS ns-457.awsdns-57.com. ctrworld.com. 172800 IN NS ns-1029.awsdns-00.org. ctrworld.com. 172800 IN NS ns-2045.awsdns-63.co.uk. CK0POJMG874LJREF7EFN8430QVIT8BSM.com. 86400 IN NSEC3 1 1 0 – CK0Q2D6NI4I7EQH8NA30NS61O48UL8G5 NS SOA RRSIG DNSKEY NSEC3PARAM CK0POJMG874LJREF7EFN8430QVIT8BSM.com. 86400 IN RRSIG NSEC3 8 2 86400 20220904042433 20220828031433 32298 com. Q8/GURHUPmV/ykhy1kMRfOyVR4SElk51JPrRU8ZNQaqSdSS6LHMibxKH mZLhMJTZKmLIQuvOLw+6r8Y/QB/g8onzYAuFILpc7Um8gAHY6tfJhO6a LHRlbYzAAvnEUlQ4ydgsE3C6/BKRw+YmalYmQTHdtbI/nEHKWJMSWWO1 cWugKBKwXk/9roUzi1dwsbdSDuhCHkurzy0/dErTk7O0lA== HECAGUU7L8JVT2TV893GE8E12DGIV9LH.com. 86400 IN NSEC3 1 1 0 – HECANTK7NHSCOVLVD7HEDDI4RVT6UHII NS DS RRSIG HECAGUU7L8JVT2TV893GE8E12DGIV9LH.com. 86400 IN RRSIG NSEC3 8 2 86400 20220904052128 20220828041128 32298 com. ktC8t9pvCmB/bOf0Qr6UyuP2HJ5phLK7Q9kTZMf599yfIMsZm07XNTrY IaR+lZjIbOCvbgIEEFQJYIHBKrSPgVaRo9gyg/83XGqOyLN+xo+IFAP6 q9DptpYX1fEU3B9Zkk4SyKiGbgoGWAXOXNfOjG9JqFd97E7RpJ8POZAH UxBt2cyDCaKMZX8YA6Pok7SeBy+oZixi+Vcs1yRwmACkNw== ;; Received 754 bytes from 192.54.112.30#53(h.gtld-servers.net) in 119 ms
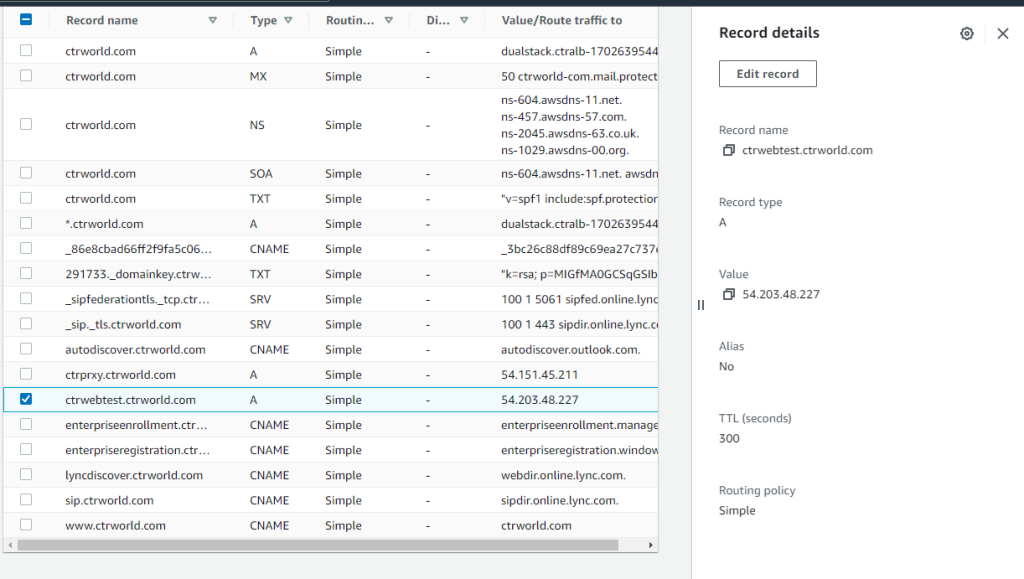
ctrwebtest.ctrworld.com. 300 IN A 34.218.60.21 ctrworld.com. 172800 IN NS ns-1029.awsdns-00.org. ctrworld.com. 172800 IN NS ns-2045.awsdns-63.co.uk. ctrworld.com. 172800 IN NS ns-457.awsdns-57.com. ctrworld.com. 172800 IN NS ns-604.awsdns-11.net. ;; Received 205 bytes from 205.251.199.253#53(ns-2045.awsdns-63.co.uk) in 5 ms
On AWS console, navigate to Route 53 -> concerned domain name (for me it was – “ctrworld.com” -> check the concerned record and edit record to change IP to new IP. Website works after this change!
High waits on cursor: mutex X after upgrading the database to 12.1.0.2, 12.2.0.1, 18c or 19c.
CPU utilization spikes to 100% due to the mutex waits leading to database hang or application outage.
Huge version count is seen for the SQL statements during the problem period.
Login or connection storm is observed during the problem.
Huge sleeps on functions kkscsAddChildNode & kkscsPruneChild as per ‘Mutex Sleep Summary’ from AWR report. Mutex Type Location Sleeps Wait Time (ms) Cursor Parent kkscsAddChildNode [KKSPRTLOC34] 302,348,122 140,622 Cursor Parent kkscsPruneChild [KKSPRTLOC35] 4,763,695 -493,302 Cursor Pin kkslce [KKSCHLPIN2] 1,232,845 659,278
Hanganalyze trace shows most of the chains running the same cursor from different processes waiting on ‘cursor: mutex X’ with the below stack. The stack trace: <-kgxExclusive<-kkscsAddChildNode<-kxscod<-kkscsCompareBinds<-kkscscid_bnd_eval<-kkscsCheckCriteria<-kkscsCheckCursor<-kkscsSearchChildList<-kksfbc<-
This is due to below internal bug which is fixed in 20.1. Unpublished Bug 28889389 : HIGH WAITS ON CURSOR: MUTEX X AFTER UPGRADE TO 12.1.0.2
This bug is hit after having observed that multiple unique sessions are waiting for a parent cursor mutex in exclusive mode on the same cursor under the following stack:-
‘cursor: mutex X’ would have been taken on the parent cursor to find out the matching child cursor for that particular SQL. Some kind of logon storm where all sessions are executing the same cursor at the same time leading to this mutex contention. The child cursor sharing code has been optimized to reduce the Mutex Contention so that exclusive mutex is not acquired for searching the child cursors for match under the same parent.
To Apply the Patch 28889389 which has the optimized code for cursor mutex while searching the parent cursor for the match.
High Waits On cursor: mutex X After Upgrading The Database to 12c, 18c & 19c (Doc ID 2625815.1)
–Copy the above, including the “;” after the “end”
IMPORTANT ==> If the user was logged to the application, please make sure he/she LOGOUT and relogin after the profile option is set.
c) Navigate to the screen to reproduce the issue. Do NOT reproduce the issue yet.
d) Just before reproducing the issue (i.e.: before clicking on FIND button) go to Help->Diagnostics->Trace->Trace With Waits and Binds ———————————————-
e) Use a stopwatch/timer while reproducing the issue. The time that you get should match or at least be similar to the time reflected in the trace that you will provide. Reproduce the issue (i.e.: Click on FIND button)
f) Turn off trace and your stopwatch/timer immediately after you get the response from the screen, and EXIT the application completely (You must logout from the Personal Home Page too) (To turn off trace: Help->Diagnostics->Trace->No Trace)g6) Run tkprof as follows for the trace file generated:
IMPORTANT: Please make sure you are using tkprof from DB Oracle Home, and that you logged out from the application. If you are still in the same session in the application, the rows column in tkprof might be all zeros.
g) IMPORTANT: Do not forget to set the profile option “Initialization SQL Statement – Custom” back to BLANK afterwardsh
h) Once you have the raw trace and sorted tkprof trace files, review them for most expensive sql (sql with most no of of fetches). Extract the sql id and plash has value for the sql with most number of fetches (most expensive SQL)
i) If you have just the sql_id from an AWR report, for example, you can use the statement below to find the plan_hash_value select sql_id from v$sql where hash_value = ‘hash value from the trace’;
j) Having the sql_id, we can obtain the “plan_hash_value” running the statement below. Note that if there is more than one plan for the same SQL, it will show multiples per the example below.
WITH p AS ( SELECT plan_hash_value FROM gv$sql_plan WHERE sql_id = TRIM(‘&&sql_id.’) AND other_xml IS NOT NULL UNION SELECT plan_hash_value FROM dba_hist_sql_plan WHERE sql_id = TRIM(‘&&sql_id.’) AND other_xml IS NOT NULL ), m AS ( SELECT plan_hash_value, SUM(elapsed_time)/SUM(executions) avg_et_secs FROM gv$sql WHERE sql_id = TRIM(‘&&sql_id.’) AND executions > 0 GROUP BY plan_hash_value ), a AS ( SELECT plan_hash_value, SUM(elapsed_time_total)/SUM(executions_total) avg_et_secs FROM dba_hist_sqlstat WHERE sql_id = TRIM(‘&&sql_id.’) AND executions_total > 0 GROUP BY plan_hash_value ) SELECT p.plan_hash_value, ROUND(NVL(m.avg_et_secs, a.avg_et_secs)/1e6, 3) avg_et_secs FROM p, m, a WHERE p.plan_hash_value = m.plan_hash_value(+) AND p.plan_hash_value = a.plan_hash_value(+) ORDER BY avg_et_secs NULLS LAST;
k) Download sqltxplain utility from
SQLT (SQLTXPLAIN) – Tool that helps to diagnose a SQL statement performing poorly Document 215187.1
The script named coe_xfr_sql_profile.sql is provided under the /utl directory.
l) Having the sql_id and the “desired” plan_hash_id, run the following:
sqlplus / as sysdba SQL> START coe_xfr_sql_profile.sql [SQL_ID] [PLAN_HASH_VALUE];
This will generate a script named like: coe_xfr_sql_profile_&&sql_id._&&plan_hash_value..sql
For example: coe_xfr_sql_profile_dnzjmxkbmk4uy_2517809292.sql
This file contains the stored profile from the database that you obtained it from. You can now use this script to apply the same plan to another database:
m) Just execute this script in the DB where you want to create this profilesqlplus / as sysdba SQL> START coe_xfr_sql_profile_dnzjmxkbmk4uy_2517809292.sqn
Metalink Reference: Using Sqltxplain To Create A ‘SQL Profile’ To Consistently Reproduce a Good SQL Plan (Doc ID 1487302.1)
Non-cdb to pdb conversion on VMDB failing with ASM errors
Inside setASMEnvironment()… ============================= Environment set ORACLE_HOME : /u01/app/19.0.0.0/grid ORACLE_SID : +ASM1 Executing ASM command: sh -c “/u01/app/19.0.0.0/grid/bin/asmcmd –privilege sysdba ls +DATA/DBATKI_TRGT”
Connected to an idle instance. ASMCMD-8102: no connection to Oracle ASM; command requires Oracle ASM to run <<<<<<<<<<<<<<<<<<<<<<<<<<<<<<<<<<<
============================= Inside unsetASMEnvironment()… ============================= Environment set ORACLE_HOME : /u01/app/oracle/product/12.1.0.2/dbhome_1 ORACLE_SID : *******FATAL ERROR******* PROGRAM : (/u01/app/oracle/product/12.1.0.2/dbhome_1/appsutil/bin/txkCreatePDB.pl) TIME : Mon Oct 25 09:57:46 2021 FUNCTION: main::validateASMDataDir [ Level 1 ] ERRORMSG: Data top directory +DATA/DBATKI_TRGT does not exists on ASM. *******FATAL ERROR******* PROGRAM : (/u01/app/oracle/product/12.1.0.2/dbhome_1/appsutil/bin/txkCreatePDB.pl) TIME : Mon Oct 25 09:57:46 2021 FUNCTION: main::validateASMDataDir [ Level 1 ] ERRORMSG: Data top directory +DATA/DBATKI_TRGT does not exists on ASM.
The EBS script “txkCreatePDB.pl” is failing with below errors:
======== Executing ASM command: sh -c “/u01/app/19.0.0.0/grid/bin/asmcmd –privilege sysdba ls +DATA/DBATKI_TRGT”
Connected to an idle instance. ASMCMD-8102: no connection to Oracle ASM; command requires Oracle ASM to run <<<<<<< – – FUNCTION: main::validateASMDataDir [ Level 1 ] ERRORMSG: Data top directory +DATA/DBATKI_TRGT does not exists on ASM.============================================This shows that this DISk doesn’t exist so first check the ASM diskgroups.
We are able to connected to the asm instance and able to see the disk groups, but from the script it is not able to connect
ASMCMD> lsdg State Type Rebal Sector Logical_Sector Block AU Total_MB Free_MB Req_mir_free_MB Usable_file_MB Offline_disks Voting_files Name MOUNTED EXTERN N 512 512 4096 4194304 8388608 5536604 0 5536604 0 Y DATA/ MOUNTED EXTERN N 512 512 4096 4194304 1679360 1669196 0 1669196 0 N RECO/ ASMCMD> exit [grid@db-test ~]$ sqlplus ‘/as sysasm’
SQL*Plus: Release 19.0.0.0.0 – Production on Mon Oct 25 12:34:50 2021 Version 19.12.0.0.0
Copyright (c) 1982, 2021, Oracle. All rights reserved.
Connected to: Oracle Database 19c Enterprise Edition Release 19.0.0.0.0 – Production Version 19.12.0.0.0
SQL> select name, state from v$asm_diskgroup;
NAME STATE —————————— ———– DATA MOUNTED RECO MOUNTED
SQL>
Solution:
oracle user was missing asmadmin group
so we added asmadmin group to oracle user
[grid@db-test ~]$ id uid=102(grid) gid=1001(oinstall) groups=1001(oinstall),1002(dbaoper),1004(asmadmin),1005(asmoper),1006(asmdba) [grid@db-test ~]$
[oracle@db-test bin]$ id uid=101(oracle) gid=1001(oinstall) groups=1001(oinstall),1002(dbaoper),1003(dba),1006(asmdba) [oracle@db-test bin]$ usermod -a -G asmadmin oracle